Build a Dynamic Sign Up Form With Alpine.js
I must have started 2020 on the right foot because my first tweet of the year was the most popular by far. It's basically a short animation of the sign up form that I built for my SaaS app 1secret.app.
I've been using @calebporzio's Alpine.js in production on https://t.co/vMtgJGIPOK and it's awesome for simple dynamic functionality like this sign up form! pic.twitter.com/NmdUeAwM9m
— Placebo Domingo (@brbcoding) January 1, 2020
Today I'll explain how I built this.
What is Alpine.js?
You might be wondering what is Alpine.js. In essence it is a front-end micro-framework that lets you build dynamic behavior fast and easy, right in your DOM, with a minimum of actual JS. It was created seemingly overnight by the never-cease-to-amaze Caleb Porzio.
The problem
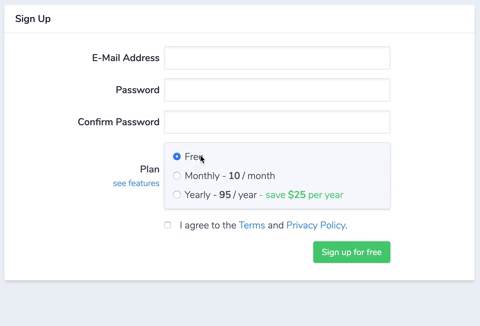
I recently implemented Stripe payments on 1secret.app and I thought it might be neat to allow the user to pay for a Premium subscription while they're signing up for a new account. They can also sign up for a Free account, then upgrade later from within the app.
I also wanted to update the text (along with the price) on the "Sign up" button when they select between the options Free, Monthly $10/m, and Yearly $95/y. So the button text would become Sign up for free, Sign up monthly for $10, etc. I've seen this pattern used before and I like it because it gives the user clear expectations of how much they will be charged (if at all).
The solution
The docs in the Alpine.js repo are fairly concise so I won't bother you with repeating everything. Let's dive into how I actually built this little feature.
Quick background: 1Secret is a Laravel app under the hood. All the behavior described below happens in Blade templates.
The sign up form lives in a register.blade.php file. In addition, there's just one line of code that goes into the master layout template app.blade.php. The latter is the template where all the content is yielded. The line in question is right before the closing body tag as shown below:
views/layouts/app.blade.php
    ...

    @yield('alpine')

</body>
</html>
Here's the simplified code for the register.blade.php template (I've omitted the text inputs, classes, and a lot of layout stuff, for brevity). Also, I hope you'll forgive my code highlighter - it doesn't seem to do well with Blade syntax.
views/auth/register.blade.php
@extends('layouts.app')

@section('alpine')
    <script src="https://cdn.jsdelivr.net/gh/alpinejs/alpine@v1.1.5/dist/alpine.js" defer></script>
@endsection

@section('content')
    <form
        id="payment-form"
        method="POST"
        action="{{ route('register') }}"
        aria-label="Register"
        x-data="{ selected: 'opt1' }"
    >
        @csrf

        <!-- Email and password inputs -->

        <label>
            Plan <a href="{{ route('features') }}">see features</a>
        </label>

        <label for="plan-free">
            <input x-on:click="selected = 'opt1'" id="plan-free" type="radio" name="plan" value="standard-free" checked>
            Free
        </label>

        <label for="plan-monthly">
            <input x-on:click="selected = 'opt2'" id="plan-monthly" type="radio" name="plan" value="premium-monthly">
            Monthly - <strong>{{ $premiumMonthlyPrice }}</strong> / month
        </label>

        <label for="plan-yearly">
            <input x-on:click="selected = 'opt3'" id="plan-yearly" type="radio" name="plan" value="premium-yearly">
            Yearly - <strong>{{ $premiumYearlyPrice }}</strong> / year <span>- save <strong>$25</strong> per year</span>
        </label>

        <div x-show="selected !== 'opt1'" x-cloak>
            <label x-show="selected !== 'opt1'" x-cloak for="card-element">
                Credit or debit card
            </label>
            <div x-show="selected !== 'opt1'" x-cloak id="card-element">
                <!-- A Stripe Element will be inserted here. -->
            </div>
        </div>

        <div x-show="selected !== 'opt1'" x-cloak>
            <!-- Stripe: used to display form errors. -->
        </div>

        <button
            id="card-button"
            name="submitPayment"
            type="submit"
            data-secret="{{ $intent->client_secret }}"
            x-text="selected === 'opt1' ? 'Sign up for free' : (selected === 'opt2' ? 'Sign up monthly for ${{ $premiumMonthlyPrice }}' : (selected === 'opt3' ? 'Sign up yearly for ${{ $premiumYearlyPrice }}' : 'Sign up for free'))"
        >
            Sign up for free
        </button>
    </form>
@endsection
Breaking it down
Let's run through smaller snippets of code in register.blade.php, starting with how Alpine.js is loaded:
@section('alpine')
    <script src="https://cdn.jsdelivr.net/gh/alpinejs/alpine@v1.1.5/dist/alpine.js" defer></script>
@endsection
Here, I'm loading it from the CDN, although you can also install it with npm.
I opted to load the Alpine.js script only on the register page. To do that, I've defined @section('alpine'), which I'm then yielding in app.blade.php.
Note 1 At the moment this is the only page where I'm using Alpine but in the future I'll probably just
@includethe script tag in a Blade partial.Note 2
@push-ing the script to a@stackis generally a cleaner way. I should do that.
Next, you might have noticed the strange x- directives in the HTML tags. These are what makes Alpine.js tick. You apply them to the DOM elements to control behavior. These should feel familiar to any Vue developer, and in fact that was Caleb's intention when he named them.
The key is the x-data directive. This represents the "state" for all the child components, in the form of a JSON object. When you assign x-data it is very important to put it on the correct element. So, for example, if you want to control a button on a form, you should put x-data on a parent element. In this case I put it on the form element itself, because there are other things in there that I want to hide or show depending on this state.
Here, x-data says that I want "option 1" (or opt1, in other words "Free") to be selected when I first load the page.
<form
    id="payment-form"
    method="POST"
    action="{{ route('register') }}"
    aria-label="Register"
    x-data="{ selected: 'opt1' }"
>
Moving on, each radio button has a x-on:click="selected = 'optX'" directive. This says "when I click an option, I want the selected state to change to that option".
<label for="plan-free">
    <input x-on:click="selected = 'opt1'" id="plan-free" type="radio" name="plan" value="standard-free" checked>
    Free
</label>
To toggle visibility, I've sprinkled a few x-show directives on the Stripe payment form elements. For example, this one x-show="selected !== 'opt1'" says "show this element if the selected option is not 1", or in actual English, "hide the payment form if the Free plan is selected (opt1)".
Finally, there's also a x-cloak directive which prevents hidden elements from flashing briefly into visibility before Alpine.js has the chance to hide them.
<div x-show="selected !== 'opt1'" x-cloak>
    <label x-show="selected !== 'opt1'" x-cloak for="card-element">
        Credit or debit card
    </label>
    <div x-show="selected !== 'opt1'" x-cloak id="card-element">
        <!-- A Stripe Element will be inserted here. -->
    </div>
</div>

<div x-show="selected !== 'opt1'" x-cloak>
    <!-- Stripe: used to display form errors. -->
</div>
If you're wondering why I'm using the same
x-showon both parent and child elements, there was some weirdness going on with the Stripe form (which is rendered via magic provided bystripe.js). This was my solution for handling that.
Demo
I also made an (even more simplified) Codepen demo for convenience.
See the Pen Payment Form by Constantin (@brbcoding-the-selector) on CodePen.
Conclusion
Alpine.js is one of the coolest things in the dev world that came out of 2019, in my opinion. It should make quick work of simple behavior that we traditionally turned to jQuery, Vue/React, or plain JavaScript for.
You might be thinking, why not just use jQuery, or plain JS then? Several reasons.
- Alpine.js is tiny (~3K minified/gzipped) compared to traditional kitchen-sink frameworks.
- It is easy to grok. The documentation has everything you need to get started.
- It precludes the need to write JS for certain tasks. Let's face it, if you're building the same interactive menus, dropdowns, tabs, etc across multiple projects, you'll probably still end up writing a mini framework of some sort. Alpine takes care of that for you, and provides a simple, consistent API.
- Maybe I don't want to write more JS than I need to. I'm fairly comfortable in JS but I'd rather not waste limited brain-CPU power trying to figure out how to build interactivity from scratch when I should be focusing on actual server-side features.
- Now (as in today) it even has simple animations.
Like Tailwind CSS, Alpine.js might take a moment to click, but once it does, the possibilities are endless. So give it a try and build cool things!
P.S.
If you'd like to give 1Secret a spin, you can use Stripe's test credit card number 4242 4242 4242 4242 to sign up for a free Premium account until the official launch that should happen later this year.