Build an edit in place component with Livewire & Alpine.js
I recently implemented an "edit in place" feature on my SaaS 1Secret, following the addition of labels for secrets. In 1Secret, you can see all the ongoing secrets on the dashboard, and they are identified by the unique short URL. This, however, is tedious to remember. While it is a minor feature, the addition of optional labels - to more clearly identify the contents of secret without opening it - was something that had been bothering me for a while.
A label is a short text description, and it can be initially created with the secret. I also wanted the ability to edit it later, directly from the dashboard. Hence the idea of "in place or inline editing".
What follows is a complete guide on how I built this feature using Livewire and AlpineJS, a deadly combo on top of Laravel, that makes a lot of SPA-like behavior possible without writing complex JavaScript. Livewire brings the back-end reactivity while Alpine handles the UI interactions. So if you're a fan of PHP and Laravel in particular, give this a 👀.
TLDR Don't feel like reading through the entire thing? No problem, here's the repo so you can dive right in.
Update Additional tinkering revealed some quirks with nested Livewire components in combination with AlpineJS. Instead of rewriting the entire guide (for the 3rd time), I'll show you my solution at the end. The repo has already been updated to reflect the changes.
Jump to the update →
Installation
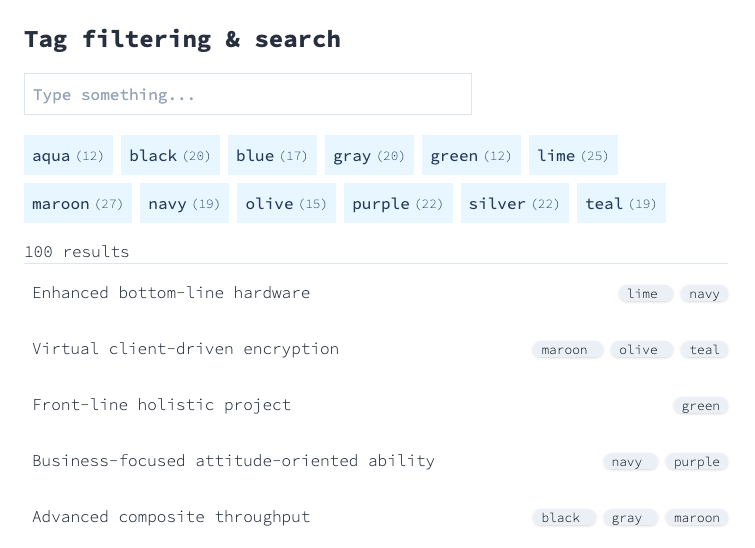
You'll find the code for this demo here. Currently it contains an additional Livewire component that handles real-time tag & text search filtering.
In your Laravel project (preferably Laravel 7.x), you'll need to install Livewire and AlpineJS.
Livewire
Follow the official installation instructions. I skipped the config & vendor assets publishing part and did only the bare minimum:
composer require livewire/livewire
In resources/views/layouts/app.blade.php import the Livewire assets (css + js):
    ...
    <!-- Laravel <= 7 -->
    @livewireStyles

    <!-- optional for Laravel >= 7 -->
    <livewire:styles/>
</head>
...
    <!-- Laravel <= 7 -->
    @livewireScripts

    <!-- optional for Laravel >= 7 -->
    <livewire:scripts/>
</body>
Notice the 2 ways of importing the assets, depending on your Laravel version. The first method works in all versions.
AlpineJS
AlpineJS can be loaded from the CDN, which works just fine for me. Add it to app.blade.php right above @livewireScripts:
...
    <script src="https://cdn.jsdelivr.net/gh/alpinejs/[email protected]/dist/alpine.js" defer></script>

    @livewireScripts
</body>
Finding a use-case for editing in place
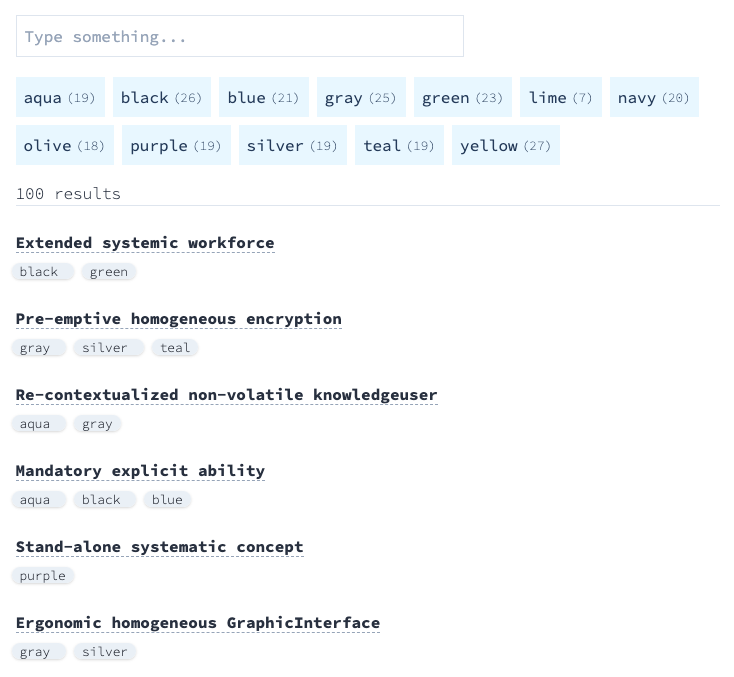
Luckily the demo project I created is already setup with data that can be reused. We're talking a list of "widgets" (random sentences), to which I randomly assigned a variable number of tags. The tags are color names.
Not shown is a column belonging to widgets called short_id, which mimics the short URL on 1Secret. Its purpose here is simply presentational - I want to display it as a default when the widget name is empty. This is what I'm starting from:
For this guide, I want to be able to edit the widget names in place. I won't be showing exactly what I did in 1Secret, to avoid exposing the internals, but the idea is similar.
Specifications
Let's whip up a few simple requirements for this feature.
Data
- Limit the length of the string to 100 characters without explicit validation
- Trim whitespace
- Empty values are saved as
NULLin the database
UI
- Click the widget name to edit it
- ESC cancels editing and preserves the original value
- ENTER saves it
- Buttons that mirror the 2 functions above
- You may save an empty widget, whereby the
short_idwill be displayed instead - Just to get a little fancy, let's make an actual widget name bold, while keeping the short_id placeholder normal
Locating the view
The view we're aiming to enhance is resources/views/livewire/widgets.blade.php. The code that displays the widget name:
...
@foreach($widgets as $widget)
    <div class="flex items-center justify-between p-2 -mx-2 hover:bg-gray-100">
        {{ $widget->name }}
...
The first task is to replace the static widget name with a Livewire component.
Generating the Livewire component
This guide requires a single Livewire component that can be generated at the command line (I use a as an alias for php artisan).
php artisan livewire:make EditName

Two files will be generated: a view and a controller class.
The public properties in the controller are accessible from the view. Data flows back and forth as if by magic, no JS required. Of course, there is JS behind the scenes but the developer need not know about it. To achieve the desired interactivity, a little something extra is needed, and that's where AlpineJS comes in.
Replacing the static part of the view with Livewire
Back in resources/views/livewire/widgets.blade.php, let's perform a simple swap with the newly created Livewire view component. Replace {{ $widget->name }} with a Livewire directive:
...
@foreach($widgets as $widget)
    <div class="flex items-center justify-between p-2 -mx-2 hover:bg-gray-100">
        @livewire('edit-name', compact('widget'), key($widget->id))
...
Notice that the syntax is identical to Laravel's @include directive. In addition, I'm passing the $widget object to the Livewire component. For nested Livewire components (which is the case here, but may not be for you) it is strongly recommended to pass a unique value to key(), just like in Vue. This will help Livewire identify the child item when the parent is updated.
In the newly created Livewire view:
<div class="p-2">
    {{ $origName }}
</div>
CAUTION The Blade view must have one, and only one root element, in this case the div. If you omit it and just use {{ $origName }}, you'll get a ErrorException Undefined offset: 1 error, then spend half an hour like a doofus trying to figure out what you did wrong.
Before this can work, there's additional work to be done in EditName, so let's open it up and add the following:
class EditName extends Component
{
    public $origName; // initial widget name state

    public function mount(Widget $widget)
    {
        $this->origName = $widget->name;
    }

    public function render()
    {
        return view('livewire.edit-name');
    }
}
mount essentially acts like __construct and we can use it to initialize certain properties, such as the widget that I passed from the view. Here, $origName will automatically become available to the view - just remember that it must be declared public.
CAUTION Though you may be tempted to do this...
public $widget;

public function mount(Widget $widget)
{
    $this->widget = $widget;
}
... don't. Any public property will be exposed to the front-end via JavaScript, so if your widget object contains sensitive info (not the case here), you'll want to extract only the properties you actually need.
Now if we reload the page, everything should have been "rewired" but still look the same.
UI interactions - make each widget name editable
So I want the widget name to change into a text input when I click it. I suspect this might be doable with pure Livewire, but the additional server requests aren't justified especially since we're not passing data, but merely toggling the UI. That's where AlpineJS comes in. We've already installed it earlier so we're good to go.
First I'll show you the complete code for the UI interactions, then I'll explain it.
resources/views/livewire/edit-name.blade.php
<div
    x-data="
        {
             isEditing: false,
             isName: '{{ $isName }}',
             focus: function() {
                const textInput = this.$refs.textInput;
                textInput.focus();
                textInput.select();
             }
        }
    "
    x-cloak
>
    <div
        class="p-2"
        x-show=!isEditing
    >
        <span
            x-bind:class="{ 'font-bold': isName }"
            x-on:click="isEditing = true; $nextTick(() => focus())"
        >{{ $origName }}</span>
    </div>
    <div x-show=isEditing class="flex flex-col">
        <form class="flex" wire:submit.prevent="save">
            <input
                type="text"
                class="px-2 border border-gray-400 text-lg shadow-inner"
                placeholder="100 characters max."
                x-ref="textInput"
                wire:model.lazy="newName"
                x-on:keydown.enter="isEditing = false"
                x-on:keydown.escape="isEditing = false"
            >
            <button type="button" class="px-1 ml-2 text-3xl" title="Cancel" x-on:click="isEditing = false">𐄂</button>
            <button
                type="submit"
                class="px-1 ml-1 text-3xl font-bold text-green-600"
                title="Save"
                x-on:click="isEditing = false"
            >✓</button>
        </form>
        <small class="text-xs">Enter to save, Esc to cancel</small>
    </div>
</div>
Cool! Now that we have the UI interaction basics in place, some explanations are in order. Essentially there are two divs inside the root element, each holding a span and a form with an input field, respectively.
Right at the top, in the wrapper div, there's a x-data Alpine directive (should look very familiar to Vue devs) that holds the state of the component as an object.
isEditing: false,toggles the visibility of the span/input; it's what gives the illusion that we are editing the item inlineisName: '{{ $isName }}',is calculated on the back-end and controls the font weight of the item (bold for actual widgets)focusis a function that is used to place the cursor inside the text input and select the contents
Below, x-cloak is used to prevent the browser from flashing hidden content before styling is applied.
Moving on to the span element, it is nested inside a parent div whose visibility is... well... visible.
x-bind:class="{ 'font-bold': isName }"will apply thefont-boldclass ifisNameis true. This isn't functional yet, it needs the logic from the back-end.x-on:click="isEditing = true; $nextTick(() => focus())"performs two functions: first it hides the span while revealing the text input, second it calls the function that places the cursor in the input and selects the contents.- ATTENTION In this particular situation,
$nextTickis a savior. Without it, Alpine will try to invokefocus()at the same time that it toggles visibility, but the DOM has not yet finished updating, so the input will not be focused after it becomes visible. With$nextTickwe are performing the two actions in a synchronous fashion, allowing the input to be rendered before interacting with it.
The form element containing the text input and the two buttons is inside a parent div that is hidden by default. If we hadn't used x-cloak, the form and its contents would briefly flash when the page is first loaded (or hard-reloaded).
- the form intercepts a
submitevent using a Livewire directive this time,wire:submit.prevent="save". In English: "prevent the form from being submitted the usual way, instead call thesave()method on the back-end" x-ref="textInput"provides a reference to the text input, that we can use in thefocus()function to focus inside itwire:model.lazy="newName"is the second Livewire directive and its purpose is to bind the contents of the text input to the$newNamevariable. This variable is not yet defined on the back-end, which is why the input is not pre-filled with the widget name. Thelazymodifier ensures that only 1 request is made to the back-end, when the input loses focus, instead of every keypress.x-on:keydown.enterandx-on:keydown.escapeboth perform the same action, namely to exit "edit mode"- the two buttons have an
x-on:clickdirective that also exits "edit mode"
Attempting to save the new value will error out, of course, since the back-end isn't wired properly yet. Let's go and do that.
On to the back-end
Once again, I'll dump the code in the Livewire controller class, then I'll explain it.
app/Http/Livewire/EditName.php
class EditName extends Component
{
    public $widgetId;
    public $shortId;
    public $origName; // initial widget name state
    public $newName; // dirty widget name state
    public $isName; // determines whether to display it in bold text

    public function mount(Widget $widget)
    {
        $this->widgetId = $widget->id;
        $this->shortId = $widget->short_id;
        $this->origName = $widget->name;

        $this->init($widget); // initialize the component state
    }

    public function render()
    {
        return view('livewire.edit-name');
    }

    public function save()
    {
        $widget = Widget::findOrFail($this->widgetId);
        $newName = (string)Str::of($this->newName)->trim()->substr(0, 100); // trim whitespace & more than 100 characters
        $newName = $newName === $this->shortId ? null : $newName; // don't save it as widget name it if it's identical to the short_id

        $widget->name = $newName ?? null;
        $widget->save();

        $this->init($widget); // re-initialize the component state with fresh data after saving
    }

    private function init(Widget $widget)
    {
        $this->origName = $widget->name ?: $this->shortId;
        $this->newName = $this->origName;
        $this->isName = $widget->name ?? false;
    }
}
The mount() method has grown quite a bit in size.
Now in addition to the widget name (origName), I'm saving the widget id (so I can locate the record when I update it), the short id (will be used as a placeholder when the widget name is empty), a dirty state (newName) that is used to bind the text input to, and a flag that toggles the font weight of the item.
An init() method take care of setting the initial state whenever 1) the component is initiated, and 2) an item is saved/updated.
Finally the save() method (which needs to be public) is the same we called earlier in the template with wire:submit.prevent="save".
Putting it all together
At this point both the view and the controller should be wired up correctly. Let's fire it up.
Notice that the dirty state represented by $newName will persist in the text input, should you cancel halfway through editing. This is a design choice I made, though it could have just as well cleared the input or reset it to the original value.
There you go, awesome inline editing capabilities with a minimum of JavaScript. If this isn't a new golden age for the monolith, I don't know what is!
The code for the demo should you wish to peruse it.
Update - Fixing the nested component functionality
The purpose of the original guide was to show how inline editing can be done with Livewire and Alpine. Mission accomplished, however, I built this functionality on top of an existing project, nesting the edit-in-place component inside the previous Livewire component. So the (now) parent component deals with filtering items (or widgets as I call them) on the page through either text search or tag selection. At the same time, each widget's name can be edited in place.
Livewire has some rules and, dare I say, limitations around nested components. Here are some of these:
- The child component must have a single root element.
- (undocumented) That root element must be a
div. - If the child component is part of a loop, it must have a
keyprop with a unique value, otherwise Livewire will get confused when it tries to update the DOM (e.g. filtering items). An example of a unique value would be the current items's id. - (undocumented) If the child is inside a loop (typically
@foreach), it should be the first line in the loop, i.e. it cannot be nested inside, say, another div. - The root
divin the child component must not have Alpine directives assigned to it. In other words, if you want putx-dataon the root div, you'll have to nest another div inside it, and initiate Alpine inside that one. While this rule is illustrated in the code samples from the official documentation it is not explicitly mentioned. A fellow dev pointed it out on Github before I noticed it.
I ran into some of these limitations while experimenting on how to fix the issues that started appearing after my original implementation.
Essentially what happened was that initial filtering (whether through text or tags) of widgets succeeded, meaning that the list of items was reduced properly. Removing the filter by deleting the text in the search box or deselecting the tags, however, produced garbled content, e.g. items not being actually restored to the correct state, or items being restored with the wrong tags. In addition, errors were thrown in the browser dev console and the JS functionality broke at this point, requiring a page reload before functionality could be restored.
So here's what I did to fix this. First, in the parent component resources/views/livewire/widgets.blade.php.
Before
Inside the @foreach is a div which contains, in order: the edit-in-place Livewire child component, and the list of tags for the current widget in the loop. This wrapper div is part of the problem, as it relates to the rules above.
...
@foreach($widgets as $widget)
    <div class="flex items-center justify-between p-2 -mx-2 hover:bg-gray-100">
        @livewire('edit-name', compact('widget'), key($widget->id))

        @if($tags = $widget->tags)
            <div class="-mx-1 text-right">
                @foreach($tags as $tag)
                    <small class="mx-1 {{ in_array($tag->id, $filters) ? 'bg-blue-200 text-blue-900' : 'bg-gray-200 text-gray-900' }} rounded-full px-2 shadow">
                        {{ $tag->name }}
                    </small>
                @endforeach
            </div>
        @endif
    </div>
@endforeach
After
Now the Livewire child component becomes the first element in the loop. This takes care of one problem.
If you're wondering why this works now, I'm pretty certain it relates to the key part I mentioned earlier. Previously, the wrapper div had no unique identifier assigned to it. This confused Livewire when the filters were removed, but now the first element in the loop is identified by key($widget->id), so items can be redrawn properly.
...
@foreach($widgets as $widget)
    @livewire('edit-name', compact('widget'), key($widget->id))

    @if($tags = $widget->tags)
        <div class="mb-4 -mt-1 -mx-2">
            @foreach($tags as $tag)
                <small class="mx-1 {{ in_array($tag->id, $filters) ? 'bg-blue-200 text-blue-900' : 'bg-gray-200 text-gray-900' }} rounded-full px-2 shadow">
                    {{ $tag->name }}
                </small>
            @endforeach
        </div>
    @endif
@endforeach
Moving on to the child component, where the inline editing is handled, resources/views/livewire/edit-name.blade.php.
Before
Alpine directives are on the root div. Now I know that this is not OK.
<div
    x-data="
        {
             isEditing: false,
             isName: '{{ $isName }}',
             focus: function() {
                const textInput = this.$refs.textInput;
                textInput.focus();
                textInput.select();
             }
        }
    "
    x-cloak
>
    <!-- the rest of the code -->
</div>
After
Instead, I've added a wrapper div with some of the styling pulled from the parent component (after removing the div that previously wrapped the child). Now the desired functionality has been restored.
<div class="flex items-center justify-between -mx-2 hover:bg-gray-100">
    <div
        class="p-2"
        x-show=!isEditing
        class="flex items-center justify-between w-full"
        x-data="
            {
                 isEditing: false,
                 isName: '{{ $isName }}',
                 focus: function() {
                    const textInput = this.$refs.textInput;
                    textInput.focus();
                    textInput.select();
                 }
            }
        "
        x-cloak
    >
        <!-- the rest of the code -->
    </div>
</div>
But...
There still remains a minor annoyance that I'm momentarily at a loss for how to fix. Take a look:
This newly-discovered paradigm forced me to change the layout a little. While previously the widget name and tag list were displayed inline (name on the left, tags on the right), now the tags are below. Why? Because of what goes on in the loop:
Before
...
@foreach($widgets as $widget)
    <div class="flex items-center justify-between">
        <div>
            <!-- Widget name -->
        </div>
        <div>
            <!-- Widget tags -->
        </div>
    </div>
@endforeach
After
...
@foreach($widgets as $widget)
    <div>
        <!-- Widget name -->
    </div>
    <div>
        <!-- Widget tags -->
    </div>
@endforeach
Now granted, I have also experimented with moving the tags inside the child component, while also passing through the $filters array from the parent. This worked, but now the filtered tags weren't highlighted anymore.
I suspect the broken highlighting micro-feature comes from the lack of reactivity between parent -> child, as documented here. To quote: "Nested components CAN accept data parameters from their parents, HOWEVER they are not reactive like props from a Vue component.".
And this makes a lot of sense, since I update the $filters array in the parent.
At the end of the day this little annoyance is something that I managed to work around, but at the same time I believe it was worth mentioning for posterity.