How to Move a Site Provisioned With Laravel Forge to a Different Domain
 Photo by frank mckenna on Unsplash
Background
I've been working on a SaaS product and I'm close to an official launch, but based on preliminary user feedback I decided to rebrand the site to a new domain name. The previous domain was rather unfortunate - sikrt.com - what I thought was catchy but ultimately proved to be confusing and hard to remember.
Luckily it's a lot easier to rebrand when you haven't yet launched. So I found an objectively much better domain - 1secret.app and I embarked on the arduous journey of moving the old site over to the new domain. The process itself is not incredibly complicated but, for a dev who prefers not to deal with devops, I ran into a couple sticking points.
My sites are deployed with Laravel Forge and hosted on Linode. I also use a few 3rd party services such as Google Analytics & Recaptcha, and Mailgun.
Here, I'm documenting the steps I took to migrate to the new domain.
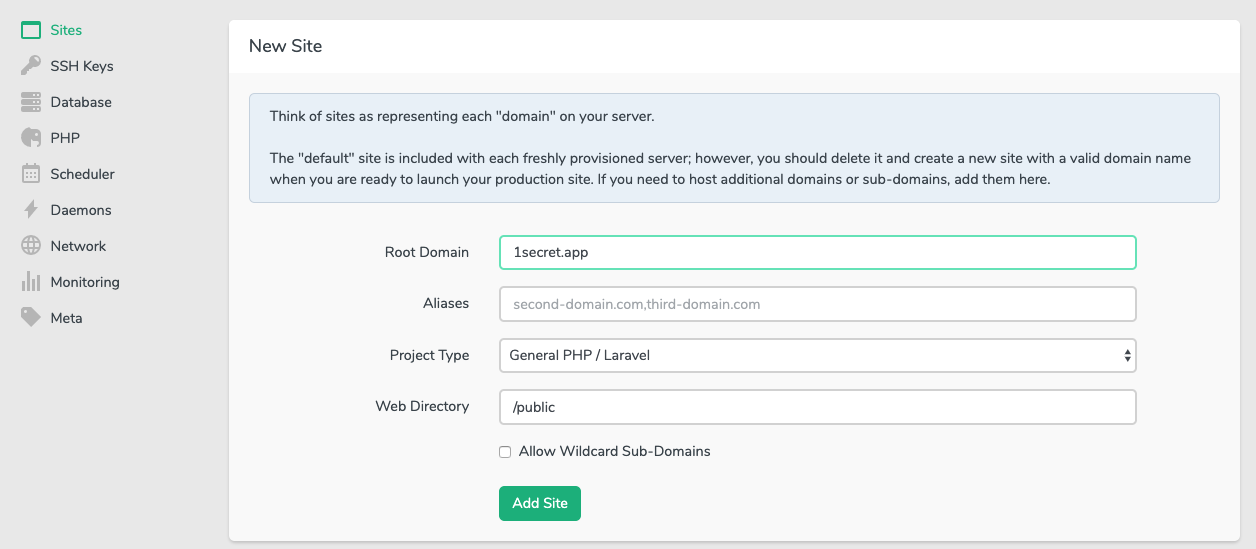
1. Setup the new site in Forge
New site
Create the new site by going to Servers, then adding a new Root Domain. In my case that would be 1secret.app.
Attach the repo
Next, attach the Github/Gitlab/etc repository where your site's code is located.
Copy environment
There's one more thing to do, which is to copy the old environment (.env) to the new site. For a Laravel project, that would be everything below the DB section since I'm keeping the same database, although you should change that as well if you decide to go with a new database.
Keeping the same database allows me to skip migrating the new one and importing the old data into it.
2. Set up DNS records in the domain registrar
My domain registrar is Namecheap.
Assuming you've already bought the new domain, click your domain, then Manage > Advanced DNS > Add new record.
Create two new A Record records:
| Type | Host | Value | TTL |
|---|---|---|---|
| A Record | * | 104.200.17.161 | Automatic |
| A Record | @ | 104.200.17.161 | Automatic |
Note that 104.200.17.161 is the IP of 1secret.app and you can get that either by pinging the domain or from Forge (under Sites).
Delete the existing CNAME Record and URL Redirect Record that were created automatically by Namecheap. These would be:
| Type | Host | Value | TTL |
|---|---|---|---|
| CNAME Record | www | parkingpage.namecheap.com. | 30 min |
| URL Redirect Record | @ | http://www.1secret.app/ | Unmasked |
Now wait for DNS to propagate (up to 48 hours, usually takes a lot less, perhaps 30 min).
3. Continue setting things up in Forge
Set up SSL
Once the DNS has propagated, it's time to set up SSL.
Go to Sites > 1secret.app > SSL > LetsEncrypt > Obtain Certificate. Let Forge do its magic.
**(Optional) Create a new database **
If you decide to use a fresh database, or change the name, go to Servers > Database > (dbname) > Add Database.
In your favorite DB client export the old DB, then import it into the new DB.
Start the queue worker
Sites > (1secret) > Queue > Start Worker (with default values).
Start the scheduler
To start Laravel's scheduler we need to create a new scheduled job. Go to Servers > Scheduler and add the following command (that would be the standard path where the site is located on a Forge-provisioned server):
php /home/forge/1secret.app/artisan schedule:run
Otherwise leave defaults in place, then click Schedule Job.
(Optional) Google services keys
In my case I use Google Recaptcha and Analytics, and I need to update the keys for the new domain. After creating a new set of keys I'll update them in .env.
Enable quick/custom deployment
My deployment setup is fairly basic: automatic deployment happens whenever I push a new tag to Gitlab where my code is hosted. Forge has a few different hooks, including on each remote push. I prefer my deployments to be more predictable (and I commit/push often) so I like the middle ground of auto-deploy on tag + manual whenever I want.
Under Sites > Apps > Turn on Quick Deployment.
Next, copy the Deployment Trigger URL because we'll need to add that to Github/Gitlab.
Jump quickly to your git provider. In my case that would be Gitlab > Settings > Integrations.
- Paste the URL
- Uncheck Push events, check Tag push events
- Add the webhook we copied previously
4. Set up email
I use Mailgun to send transactional emails from 1secret.app. That needs to be set up with my domain registar (Namecheap).
A little rant first. Getting email to work properly has been the bane of my existence. Both Mailgun and Namecheap give slightly contradictory instructions and I was forced to find my own settings that seem to work. And yet, I still have a vague suspicion that perhaps I didn't do this perfectly. Oh well, let's dive in.
In Mailgun
Add a new domain: Settings > Domains > Add New Domain.
Domain name: mg.1secret.app / US
Check Create DKIM Authority and select 2048.
In Namecheap
Add a new DNS record. In the end these are the settings that worked for me:
| Type | Host | Value | TTL |
|---|---|---|---|
| CNAME | email.mg |
mailgun.org |
Automatic |
| TXT | mg |
v=spf1 include:mailgun.org ~all |
Automatic |
| TXT | smtp._domainkey.mg |
k=rsa; p=... |
Automatic |
Mail settings -> Custom MX
| Type | Host | Priority | Value |
|---|---|---|---|
| MX | mg |
10 |
mxa.mailgun.org |
| MX | mg |
10 |
mxb.mailgun.org |
Once you've set these up, click Verify DNS Settings. This can take 24-48 hours to propagate but for me it was instant once I arrived at the correct set of values.
5. Add the Mailgun credentials in Forge
Go back to Forge and update .env with the Mailgun credentials:
[email protected]
MAIL_PASSWORD=...
MAIL_FROM_NAME=1Secret
[email protected]
To clear the previous values from the config/env cache, reboot the server. I also run php artisan optimize:clear as a deploy task.
6. Redirect the old domain to the new one
Now that I've got everything set up, I want to redirect all the traffic from sikrt.com to 1secret.app. The reason for that is I'm letting the sikrt.com domain expire, but until that happens, I want a permanent 301 redirect on it, to 1secret.app.
I tried several redirect methods (in Namecheap and Forge), but ultimately what worked for me was to add a forced redirect directly in the Nginx configuration.
You can do this manually on the server or just use Forge itself to edit the Nginx configuration for the old site: Sites > sikrt.com > Files > Edit Nginx Configuration.
Insert this line return 301 https://1secret.app; as shown below:
# FORGE CONFIG (DO NOT REMOVE!)
include forge-conf/sikrt.com/before/*;

server {
    listen 443 ssl http2;
    listen [::]:443 ssl http2;
    server_name sikrt.com;

    return 301 https://1secret.app;

    root /home/forge/sikrt.com/public;
Assuming everything went correctly, from now on, when someone loads sikrt.com they'll be redirected to 1secret.app. Another benefit is that, due to this being a permanent redirect, Google knows not to penalize your site(s) for duplicate content.
Fin
This concludes my fairly convoluted procedure for migrating a site that was provisioned with Forge from an old domain to a new one. It's not fun moving sites to new domains but luckily it's not a thing that needs to be done very often.
I set out to document the procedure in as much detail as possible but the various frustrations that popped up while I was doing it put a damper on that. I apologize in advance for any errors but if you do find any please drop a line . I also kind of regret not taking screenshots but those would have made the whole thing even longer and I just wanted to get through it.